OpenAI GPT-3.5 Turbo Fine-tuning using Python & Google Sheets
Earlier, fine-tuning was only available for the davinci model, but recently, OpenAI has announced that gpt-3.5-turbo is also available for fine-tuning. And it brings whole new possibilities for developers to bring their own data and customize the model for their use cases.
In this blog post, I will be touching on the following areas of fine-tuning:
- What is fine-tuning?
- When can you use fine-tuning?, and
- How can you fine-tune the gpt-3.5-turbo model with your data?
So let’s get directly to it…
What is fine-tuning?
Fine-tuning is a process where small adjustments are made to a pre-trained AI model (like OpenAI’s GPT-3.5) to make the model more accurate and useful. It’s like customizing an AI model for your use case.
While fine-tuning may seem like a complicated thing to do, it’s not. You just have to provide a sample of prompts-outputs in the format that you want, and the model learns.
When should you use fine-tuning?
Following are the cases when you should consider fine-tuning a model:
- You want the output from the AI model to be in a certain format
- You want to ensure better adherence to instructions
- You want to maintain consistency in your outputs
- You want a custom tone so that the AI output resonates with your brand voice
- You want to correct the failures to follow complex prompts
- You want to perform a task that difficult to explain in a prompt
- You want to format outputs in a specific way, etc.
Now, let’s see how you can fine-tune the gpt-3.5-turbo model with your data…
Fine-tuning the gpt-3.5-turbo model by OpenAI
While several different programming languages can be used to set up a fine-tuning job, in this blog post, I will be explaining how to use Python for this.
OpenAI has made it easy to prepare the dataset, check it for errors, and then set up a tuning job by using Python. You can just use the OpenAI Python library for all this.
I have created a quick video showing everything step-by-step (get the Google Sheets featured in the video).
But if you’re looking for more detailed information and/or prefer reading to watching, please keep reading.
1. Prepare the data set
First of all, you will have to prepare the dataset you have in the following JSONL format, as OpenAI recommends.
{"messages": [{"role": "system", "content": "<system prompt>"}, {"role": "user", "content": "<user prompt>"}, {"role": "assistant", "content": "<model output>"}]}In the above format, followings are the placeholders:
<system prompt>is the system prompt the model should get<user prompt>is the prompt to be provided or the question to be asked to the model, and<model output>is the output that the model should come up with
Recommended read: How to write better ChatGPT prompts
For example, if I am preparing a dataset for dad jokes, then it would look something like the below. You can either keep the system prompt the same for all or may also use different ones for each line.
{"messages": [{"role": "system", "content": "You are a funny person that always keeps cracking dad jokes"},{"role": "user", "content": "What would you call a fake pasta?"},{"role": "assistant", "content": "An impasta"}]}
{"messages": [{"role": "system", "content": "You are a funny person that always keeps cracking dad jokes"},{"role": "user", "content": "What's orange and sounds like a parrot?"},{"role": "assistant", "content": "A carrot"}]}
{"messages": [{"role": "system", "content": "You are a funny person that always keeps cracking dad jokes"},{"role": "user", "content": "How many people understand the difference between a numerator and a denominator?"},{"role": "assistant", "content": "Just a fraction of people"}]}
Remember, the more lines of data you provide, the better the fine-tuned model will perform.
You will have to save the formatted dataset in a .jsonl file, it will be used to upload to the OpenAI server for setting up the fine-tuning job.
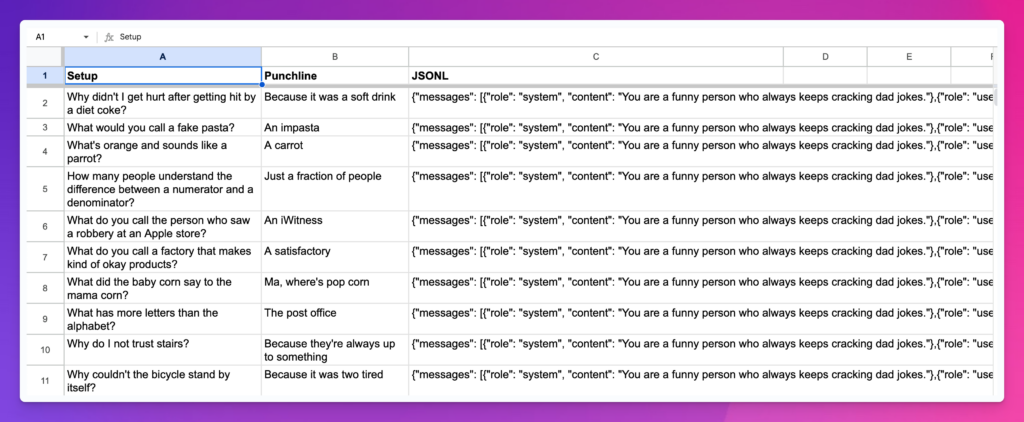
If you’re struggling with preparing your data in the given format, you can also use the Google Sheets file shown in the above screenshot and the video above.
2. Install the Python openai library
For this to work, you need to have Python installed on your computer. In most cases, you should already have Python installed on your machine, but if not, you can install from here.
After that, open up your terminal and install the openai library by running the below command.
pip install --upgrade openaiWithin seconds, it will install or upgrade (if already installed) the openai library on your computer.
After that, open the folder in the code editor of your choice and follow the next steps.
3. Check the prepared dataset
It’s always recommended to check the formatting of your prepared data for any mistakes and errors. For this, create a file named verify.py in the folder and copy-paste the following code.
# We start by importing the required packages
import json
import os
import tiktoken
import numpy as np
from collections import defaultdict

# Next, we specify the data path and open the JSONL file
data_path = "DATA_FILE_NAME"

# Load dataset
with open(data_path) as f:
    dataset = [json.loads(line) for line in f]

# We can inspect the data quickly by checking the number of examples and the first item

# Initial dataset stats
print("Num examples:", len(dataset))
print("First example:")
for message in dataset[0]["messages"]:
    print(message)

# Now that we have a sense of the data, we need to go through all the different examples and check to make sure the formatting is correct and matches the Chat completions message structure

# Format error checks
format_errors = defaultdict(int)

for ex in dataset:
    if not isinstance(ex, dict):
        format_errors["data_type"] += 1
        continue

    messages = ex.get("messages", None)
    if not messages:
        format_errors["missing_messages_list"] += 1
        continue

    for message in messages:
        if "role" not in message or "content" not in message:
            format_errors["message_missing_key"] += 1

        if any(k not in ("role", "content", "name") for k in message):
            format_errors["message_unrecognized_key"] += 1

        if message.get("role", None) not in ("system", "user", "assistant"):
            format_errors["unrecognized_role"] += 1

        content = message.get("content", None)
        if not content or not isinstance(content, str):
            format_errors["missing_content"] += 1

    if not any(message.get("role", None) == "assistant" for message in messages):
        format_errors["example_missing_assistant_message"] += 1

if format_errors:
    print("Found errors:")
    for k, v in format_errors.items():
        print(f"{k}: {v}")
else:
    print("No errors found")

# Beyond the structure of the message, we also need to ensure that the length does not exceed the 4096 token limit.

# Token counting functions
encoding = tiktoken.get_encoding("cl100k_base")

# not exact!
# simplified from https://github.com/openai/openai-cookbook/blob/main/examples/How_to_count_tokens_with_tiktoken.ipynb
def num_tokens_from_messages(messages, tokens_per_message=3, tokens_per_name=1):
    num_tokens = 0
    for message in messages:
        num_tokens += tokens_per_message
        for key, value in message.items():
            num_tokens += len(encoding.encode(value))
            if key == "name":
                num_tokens += tokens_per_name
    num_tokens += 3
    return num_tokens

def num_assistant_tokens_from_messages(messages):
    num_tokens = 0
    for message in messages:
        if message["role"] == "assistant":
            num_tokens += len(encoding.encode(message["content"]))
    return num_tokens

def print_distribution(values, name):
    print(f"\n#### Distribution of {name}:")
    print(f"min / max: {min(values)}, {max(values)}")
    print(f"mean / median: {np.mean(values)}, {np.median(values)}")
    print(f"p5 / p95: {np.quantile(values, 0.1)}, {np.quantile(values, 0.9)}")

# Last, we can look at the results of the different formatting operations before proceeding with creating a fine-tuning job:

# Warnings and tokens counts
n_missing_system = 0
n_missing_user = 0
n_messages = []
convo_lens = []
assistant_message_lens = []

for ex in dataset:
    messages = ex["messages"]
    if not any(message["role"] == "system" for message in messages):
        n_missing_system += 1
    if not any(message["role"] == "user" for message in messages):
        n_missing_user += 1
    n_messages.append(len(messages))
    convo_lens.append(num_tokens_from_messages(messages))
    assistant_message_lens.append(num_assistant_tokens_from_messages(messages))

print("Num examples missing system message:", n_missing_system)
print("Num examples missing user message:", n_missing_user)
print_distribution(n_messages, "num_messages_per_example")
print_distribution(convo_lens, "num_total_tokens_per_example")
print_distribution(assistant_message_lens, "num_assistant_tokens_per_example")
n_too_long = sum(l > 4096 for l in convo_lens)
print(f"\n{n_too_long} examples may be over the 4096 token limit, they will be truncated during fine-tuning")

# Pricing and default n_epochs estimate
MAX_TOKENS_PER_EXAMPLE = 4096

MIN_TARGET_EXAMPLES = 100
MAX_TARGET_EXAMPLES = 25000
TARGET_EPOCHS = 3
MIN_EPOCHS = 1
MAX_EPOCHS = 25

n_epochs = TARGET_EPOCHS
n_train_examples = len(dataset)
if n_train_examples * TARGET_EPOCHS < MIN_TARGET_EXAMPLES:
    n_epochs = min(MAX_EPOCHS, MIN_TARGET_EXAMPLES // n_train_examples)
elif n_train_examples * TARGET_EPOCHS > MAX_TARGET_EXAMPLES:
    n_epochs = max(MIN_EPOCHS, MAX_TARGET_EXAMPLES // n_train_examples)

n_billing_tokens_in_dataset = sum(min(MAX_TOKENS_PER_EXAMPLE, length) for length in convo_lens)
print(f"Dataset has ~{n_billing_tokens_in_dataset} tokens that will be charged for during training")
print(f"By default, you'll train for {n_epochs} epochs on this dataset")
print(f"By default, you'll be charged for ~{n_epochs * n_billing_tokens_in_dataset} tokens")
print("See pricing page to estimate total costs")
Note that, you need to put the data file in the same folder and then replace the
DATA_FILE_NAMEplaceholder in the above code with the filename of your data file, e.g.data.jsonl.
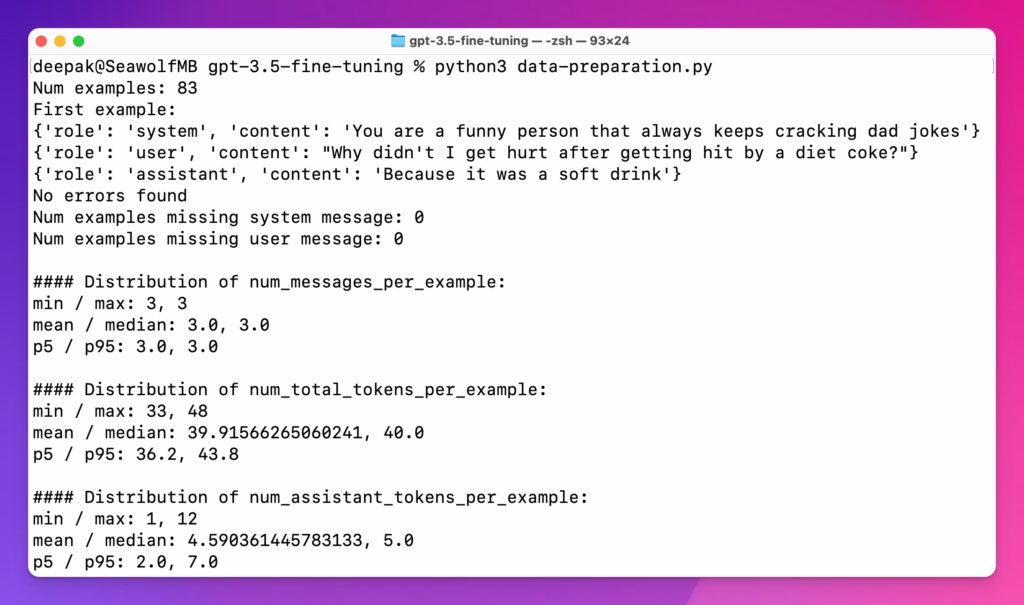
Save everything and execute the Python file by running python verify.py command and if you see an output like below, it’s good to go. If not, try to fix all the errors.
Now, let’s move to the next and most important step.
4. Upload the data file
Now that your dataset is ready and has been checked for errors, it’s time to upload the file.
Just create a file called upload.py and copy-paste the following code inside it.
import openai
import os

openai.api_key = "YOUR_OPENAI_API_KEY"

def fine_tune_model(file_path):
    # Upload the file
    with open(file_path, "rb") as file_data:
        upload_response = openai.File.create(
        file=file_data,
        purpose='fine-tune'
    )

    file_id = upload_response.id
    print(f"File uploaded successfully. ID: {file_id}")

# Usage
fine_tune_model("DATA_FILE_PATH")
Replace the YOUR_OPENAI_API_KEY with your OpenAI API key that you get from here, and DATA_FILE_PATH with the file name of your JSONL data file. And run it by using python upload.py command in your terminal.
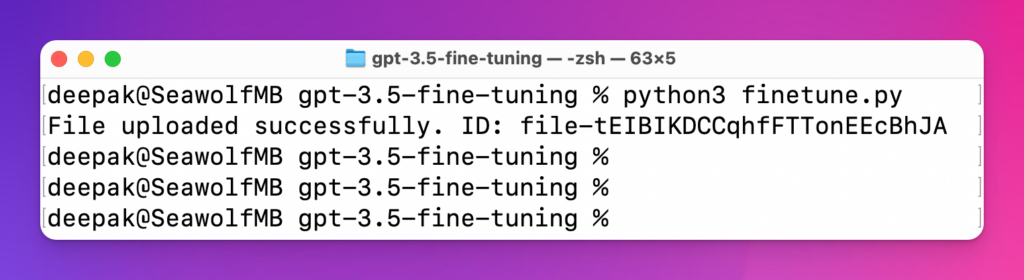
After running the command, you should see the file ID, copy it to your clipboard and save it somewhere. In the above example, the file ID is file-tEIBIKDCCqhfFTTonEEcBhJA as you see in the above screenshot.
You will have to wait for some time to let the uploaded file get processed, and then only move forward to start the fine-tuning job. And there is no way to know how much time it’s going to take, but it will a few minutes to get ready (may take longer as well).
5. Start the fine-tuning job
After waiting for a few minutes, start the fine-tuning job by using the following code. Copy-paste the below code and save it in a file called, say tuning.py:
import openai

openai.api_key = "YOUR_OPENAI_API"

def start_finetuning_job(file_id, model="gpt-3.5-turbo"):
    try:
        job = openai.FineTuningJob.create(training_file=file_id, model=model)
        print(f"Fine-tuning job created successfully: {job}")
        return job
    except Exception as e:
        print(f"Failed to create fine-tuning job. Error: {e}")
        return None

start_finetuning_job("UPLOADED_FILE_ID")
Again, here replace the YOUR_OPENAI_API with your actual API and UPLOADED_FILE_ID with the file ID that you copied after uploading the file in the previous step.
After that, run it by using the command python tuning.py and you should see an output like below:
Fine-tuning job created successfully: {
  "object": "fine_tuning.job",
  "id": "ftjob-Ev8n8ak6P2BrRL5HuTlXtJqE",
  "model": "gpt-3.5-turbo-0613",
  "created_at": 1693580822,
  "finished_at": null,
  "fine_tuned_model": null,
  "organization_id": "org-YTt0po6sdMHIQtg9Ng1SbquI",
  "result_files": [],
  "status": "created",
  "validation_file": null,
  "training_file": "file-tEIBIKDCCqhfFTTonEEcBhJA",
  "hyperparameters": {
    "n_epochs": 3
  },
  "trained_tokens": null
}
If you see the above output, it means that the fine-tuning process has successfully started. You will receive an email from OpenAI after the process gets completed, and start using the fine-tuned model anywhere you want.
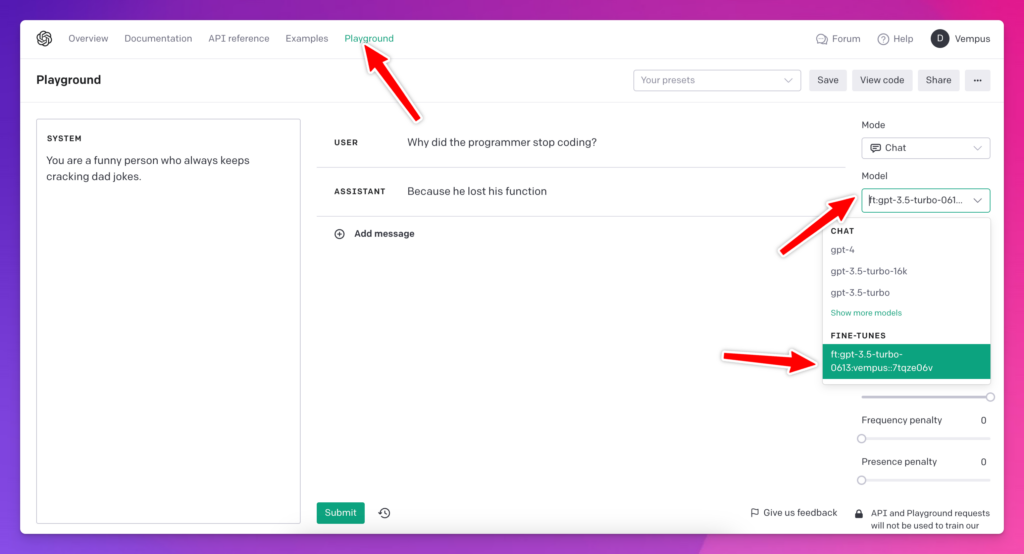
To get started, you can start using the new fine-tuned model inside OpenAI Playground and check if everything is working properly, as shown in the above screenshot.
And you’re done fine-tuning the gpt-3.5-turbo model with your data and start using it wherever you want.
Featured resources:
- YouTube video explaining everything
- Google Sheets for preparing the dataset
- GitHub repo with the Python code
That’s it.
If you get stuck somewhere, kindly feel free to let me know in the comments below.